BLE 개발을 위한 NRF52 DK 개발 보드 기본 사용법을 설명한다. Adafruit 등의 다양한 DK가 있지만 가장 범용성이 큰 PCA10056기반의 DK를 구매했다. 해외 구매를 해야 하고 현재는 eleparts를 통해 구매하는 게 가장 간단해 보인다.

개발을 위해 필요한 툴은 다음과 같다.
- GNU Tools ARM Embedded
- nRF Command Line Tools
- NRF5 SDK
- GNU Make
다음 글은 Windows 10 기준이다.
GNU Tools ARM Embedded 설치
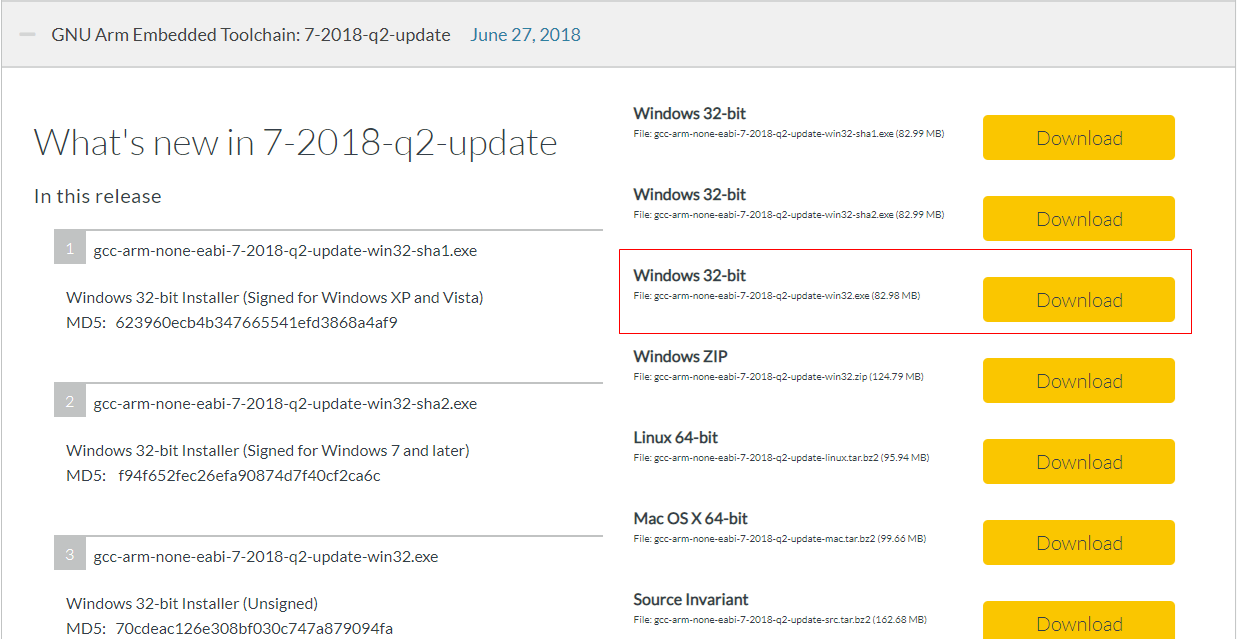
소스코드 컴파일을 위해서 필요한 툴이다. 다운로드 링크에 들어가서 개발환경에 맞는 파일을 다운받는다. 나는 최신 버전을 받았을 때 컴파일 작업에서 오류가 나서 7 2018-q2-update로 설치했다. 설치 마지막 단계에서 환경 변수 추가 옵션을 체크해준다. 체크를 하지 않은 경우는 사진을 참고해서 (INSTALL_DIR)\(VERSION)\bin 을 "Path" 환경 변수에 추가해준다.

설치가 됐는지 확인하기 위해 PowerShell이나 cmd 등의 shell에서 다음을 입력한다.
arm-none-eabi-gcc --version버전 정보를 나중에 입력해야하니 기억하자. 여기서는 7.3.1 이다.
PS C:\Users\HyunsungKim> arm-none-eabi-gcc --version
arm-none-eabi-gcc.exe (GNU Tools for Arm Embedded Processors 7-2018-q2-update) 7.3.1 20180622 (release) [ARM/embedded-7-branch revision 261907]
Copyright (C) 2017 Free Software Foundation, Inc.
This is free software; see the source for copying conditions.  There is NO
warranty; not even for MERCHANTABILITY or FITNESS FOR A PARTICULAR PURPOSE.
nRF Command Line Tools 설치
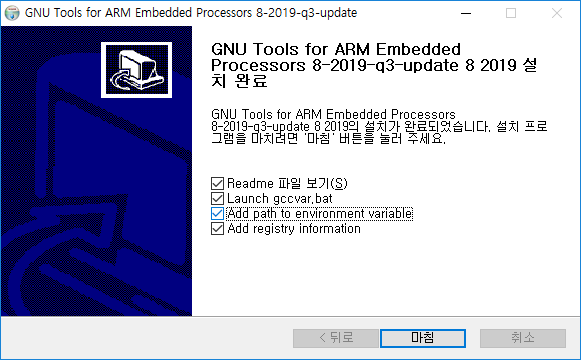
커맨드라인에서 컴파일 작업, 펌웨어 업로드 등의 작업을 하기 위한 툴이다. 다운로드 링크에 들어가서 아래쪽의 Download 탭에서 설치 파일을 다운로드하여 설치한다. 중간에 뜨는 Segger J-Link USB Driver도 설치한다.

설치 완료 후 확인을 위해 shell 에서 다음을 입력한다.
nrfjprog --versionPS C:\Users\HyunsungKim> nrfjprog --version
nrfjprog version: 10.3.0
JLinkARM.dll version: 6.44e오류가 뜰 경우 시스템 환경 변수 "Path"에 다음이 추가돼있는지 확인한다.
C:\Program Files (x86)\Nordic Semiconductor\nrf-command-line-tools\bin\
NRF5 SDK 다운로드
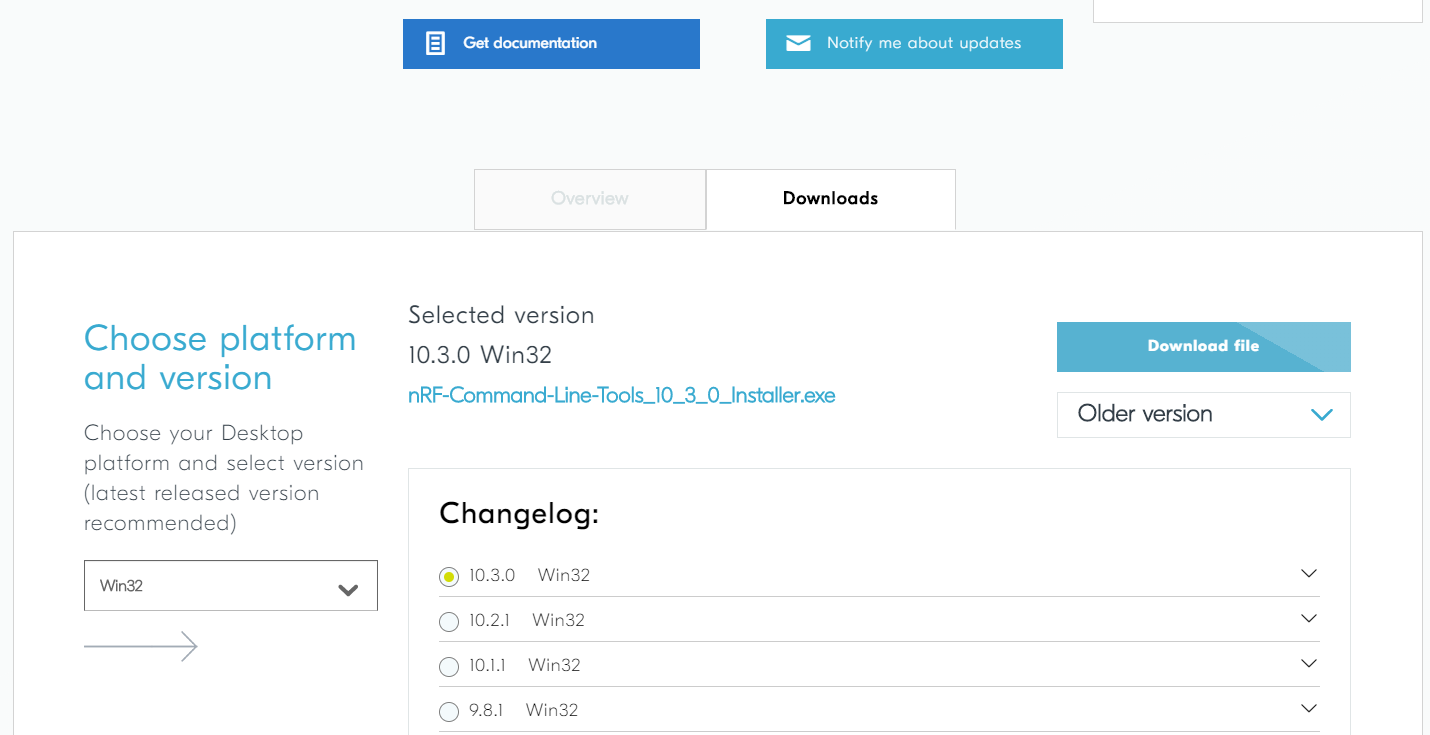
개발을 위한 소스파일과 예제 파일을 담고 있다. 다운로드 링크에 들어가서 원하는 버전의 zip 파일을 받은 후 압축해제 하면 된다. 나는 현재 최신 버전인 nRF5_SDK_15.3.0_59ac345.zip 을 받았다.
GNU Make 설치
다음을 shell에 입력한다.
make --versionGNU Make 3.81
Copyright (C) 2006 Free Software Foundation, Inc.
This is free software; see the source for copying conditions.
There is NO warranty; not even for MERCHANTABILITY or FITNESS FOR A
PARTICULAR PURPOSE.
This program built for i386-pc-mingw32버전 정보가 뜬다면 이미 설치가 돼있는 것이며, 오류가 뜬다면 링크를 참고해서 설치를 하고 환경 변수 C:\Program Files (x86)\GnuWin32\bin 추가까지 완료한다.
(위의 링크가 터질 경우 직접 다운로드 링크1, 링크2)
NRF5 SDK 기본 설정
(NRF5 SDK 설치 경로)\components\toolchain\gcc 접속
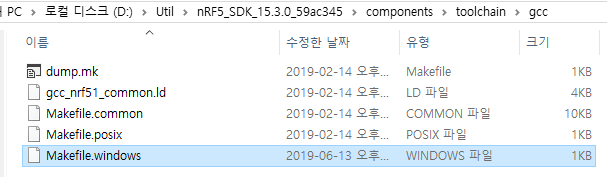
Makefile.windows의 내용을 편집한다. GNU_INSTALL_ROOT는 GNU Tools ARM Embedded 설치 경로, GNU_VERSION은 쉘에서 확인했던 버전 정보를 넣는다. 아래는 나의 개발 환경에서의 예시이며 잘못 기입할 경우 이후에 컴파일이 되지 않는다.
GNU_INSTALL_ROOT := D:/Util/GNU Tools ARM Embedded/7 2018-q2-update/bin/
GNU_VERSION := 7.3.1
GNU_PREFIX := arm-none-eabi
Makefile.common은 건드릴 것이 없고 리눅스 사용자는 Makefile.posix를 같은 방식으로 편집해준다.
예제 컴파일 및 펌웨어 업로드
예제 파일을 업로드해서 스마트폰과 DK 사이의 BLE 통신을 해보자. DK 보드가 peripheral, 스마트폰이 central이 된다. 예제 파일 디렉토리 (NRF SDK 설치 경로)\examples\ble_peripheral\ble_app_uart\pca10056\s140\armgcc 으로 이동한 후 위쪽 창에 powershell을 입력하여 shell 창을 띄운다.

make정상적으로 진행될 경우 아래와 같이 보여지며 _build 폴더 안에 컴파일된 hex 파일이 생성된다.
PS D:\Downloads\nRF5_SDK_15.3.0_59ac345\examples\ble_peripheral\ble_app_uart\pca10056\s140\armgcc> make
mkdir _build
cd _build && mkdir nrf52840_xxaa
Assembling file: gcc_startup_nrf52840.S
Compiling file: nrf_log_backend_rtt.c
Compiling file: nrf_log_backend_serial.c
Compiling file: nrf_log_default_backends.c

( . . . )

Compiling file: nrf_sdh_ble.c
Compiling file: nrf_sdh_soc.c
Linking target: _build/nrf52840_xxaa.out
   text    data     bss     dec     hex filename
  38172     548    4604   43324    a93c _build/nrf52840_xxaa.out
Preparing: _build/nrf52840_xxaa.hex
Preparing: _build/nrf52840_xxaa.bin
DONE nrf52840_xxaa
DK 보드가 USB로 연결된 상태에서 다음 명령어를 차례로 입력한다. 각각, 기존의 펌웨어를 지우고, softdevice라는 protocol stack을 업로드하고, 마지막으로 위의 make로 컴파일 된 hex파일을 업로드 하는 것이다.
make erase
make flash_softdevice
make flash
정상적으로 진행될 경우 아래와 같이 보여진다.
PS D:\Downloads\nRF5_SDK_15.3.0_59ac345\examples\ble_peripheral\ble_app_uart\pca10056\s140\armgcc> make erase
nrfjprog -f nrf52 --eraseall
Erasing user available code and UICR flash areas.
Applying system reset.
PS D:\Downloads\nRF5_SDK_15.3.0_59ac345\examples\ble_peripheral\ble_app_uart\pca10056\s140\armgcc> make flash_softdevice
Flashing: s140_nrf52_6.1.1_softdevice.hex
nrfjprog -f nrf52 --program ../../../../../../components/softdevice/s140/hex/s140_nrf52_6.1.1_softdevice.hex --sectorerase
Parsing hex file.
Erasing page at address 0x0.
Erasing page at address 0x1000.

( . . . )

Erasing page at address 0x23000.
Erasing page at address 0x24000.
Erasing page at address 0x25000.
Applying system reset.
Checking that the area to write is not protected.
Programming device.
nrfjprog -f nrf52 --reset
Applying system reset.
Run.
PS D:\Downloads\nRF5_SDK_15.3.0_59ac345\examples\ble_peripheral\ble_app_uart\pca10056\s140\armgcc> make flash
DONE nrf52840_xxaa
Flashing: _build/nrf52840_xxaa.hex
nrfjprog -f nrf52 --program _build/nrf52840_xxaa.hex --sectorerase
Parsing hex file.
Erasing page at address 0x26000.

( . . . )

Erasing page at address 0x2F000.
Applying system reset.
Checking that the area to write is not protected.
Programming device.
nrfjprog -f nrf52 --reset
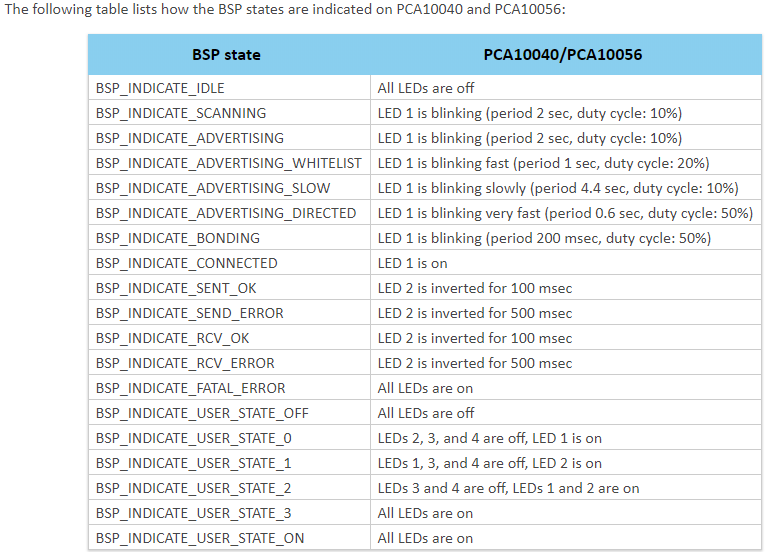
DK 보드를 관찰하면 LED1이 2초 주기로 점멸하는 것을 알 수 있다. 아래의 표에 따르면 advertising 상태라는 의미이며 스마트폰의 연결을 기다리고 있다는 뜻이다.
스마트폰과 페어링
구글 플레이스토어에서 nRF Toolbox를 설치한다. 앱을 실행한 후 UART 버튼을 누른 후 "NORDIC_UART"와 페어링한다. 페어링이 되면 DK보드의 LED1이 켜진 상태로 유지된다. 페어링이 된 후 앱 상에서 오른쪽으로 swipe하면 로그 창이 뜬다.
DK 보드를 수 분 방치하면 절전 모드(BSP_INDICATE_USER_STATE_OFF)에 들어가서 블루투스 목록에 뜨지 않는다. 보드 상의 Button1이나 reset 버튼을 누르면 절전모드에서 벗어난다.


아직은 로그만 주고받는 것을 알 수 있다. 메시지를 주고받거나 그 외의 동작을 하기 위해서는 기본 예제를 바탕으로 소스 코드를 편집해야한다. 소스코드와 makefile을 편집한 후 다시 make 부터 시작하면 된다.
소스코드: (NRF SDK 설치 경로)\examples\ble_peripheral\ble_app_uart\main.c
Makefile: (NRF SDK 설치 경로)\examples\ble_peripheral\ble_app_uart\pca10056\s140\armgcc
노르딕 SDK의 소스코드를 편집하는 것은 훨씬 더 넓은 영역이고 나도 잘 알지는 못한다. 공부를 더 한 후 기회가 되면 포스팅을 시도해보겠다.
참고
NRF52 DK 구매 링크: http://eleparts.co.kr/goods/view?no=6756803
GCC 컴파일러 연동: https://devzone.nordicsemi.com/nordic/nordic-blog/b/blog/posts/development-with-gcc-and-eclipse
'개발&공작' 카테고리의 다른 글
| 도,분,초 -> 도 변환 (0) | 2019.09.07 |
|---|---|
| NMEA GGA, RMC parsing C code (0) | 2019.09.06 |
| HM-10 블루투스 모듈 115200bps에서 data drop 문제 (0) | 2019.09.06 |
| [기타] BOB-12009 Bi-directional Level Converter (0) | 2019.08.18 |
| [STM32] TrueStudio 디버깅 오류 (0) | 2019.08.17 |
| [STM32] ST-Link가 없을 때 커스텀 보드 프로그래밍하기 (0) | 2019.08.17 |


